# 使用三元表达式给 data 赋值
效果要求:
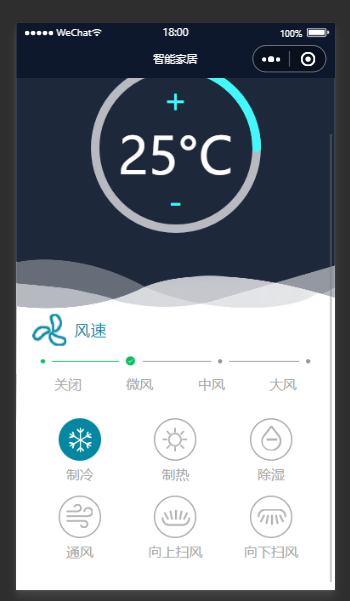
点击切换不同的图片。图片是数据里面渲染出来的。效果如图:
view 代码
<view class="model"> <view class="item" wx:for="{{model}}" wx:key="id" bind:tap="model" data-list="{{index}}"> <image class="model_img" src="{{item.active ? item.src : item.url}}"/> <text class="model_title">{{item.title}}</text> </view> </view>
js 代码
Page({ data: { value: 25, select: true, selects: false, gradientColor: { '0%': '#ffd01e', '100%': '#ee0a24', }, active: 1, steps: [{desc: '',},{desc: '',},{desc: '',},{desc: '',}], // 使用 vant 框架里面的插件 model:[ {"id":"1", title:"制冷", active:true, "url":"https://img10.360buyimg.com/ddimg/jfs/t1/134516/26/19333/3270/5fd33f78E9c136a59/0b19ff0493f32e4c.png", "src":"https://img12.360buyimg.com/ddimg/jfs/t1/150035/29/17912/3382/5fd32c66Ee98ecb19/46608164068c29f3.png" },{"id":"2", title:"制热", active:false, "url":"https://img13.360buyimg.com/ddimg/jfs/t1/145313/32/18095/3151/5fd33f78E3f2d49c0/1b86c110299cbdc1.png", "src":"https://img14.360buyimg.com/ddimg/jfs/t1/134767/24/19690/3071/5fd32c66Ea9940e9b/b89e37d1c4db6830.png" }, {"id":"3", title:"除湿", active:false, "url":"https://img12.360buyimg.com/ddimg/jfs/t1/133916/15/19322/3365/5fd33f78E5fb0d7b5/6ad3f85545bfbe39.png", "src":"https://img13.360buyimg.com/ddimg/jfs/t1/147302/27/17867/3015/5fd32c66E5176019b/30cad177a93d549d.png" },{"id":"4", title:"通风", active:false, "url":"https://img13.360buyimg.com/ddimg/jfs/t1/153818/16/9478/3087/5fd33f78Ecc084dde/ecf2935da0de6e31.png", "src":"https://img11.360buyimg.com/ddimg/jfs/t1/146277/39/17976/2868/5fd32c66Ebd73527e/d946e66f1984ccd9.png" },{"id":"5", title:"向上扫风", active:false, "url":"https://img10.360buyimg.com/ddimg/jfs/t1/145786/17/17977/3971/5fd33f78E59684630/cf26aa59b216555b.png", "src":"https://img10.360buyimg.com/ddimg/jfs/t1/132750/9/19225/3036/5fd32c66Ec7df8a55/0b6dd2dcdfa57cdd.png" },{"id":"6", title:"向下扫风", active:false, "url":"https://img13.360buyimg.com/ddimg/jfs/t1/133678/20/19346/3961/5fd33f78Edf3cb491/d6f2c03e310629be.png", "src":"https://img11.360buyimg.com/ddimg/jfs/t1/137747/37/18156/3152/5fd32c66E5213f371/04484666357f9863.png" }], }, level:function(e){ var index = e.currentTarget.dataset.list this.setData({active: index
}) }, jia:function(){ const value = this.data.value; this.setData({ value: parseInt(value) + 10 }) }, jian:function(){ const value = this.data.value; this.setData({ value: parseInt(value) - 10 }) }, model:function(e){ console.log(e) const list = e.currentTarget.dataset.list this.data.model.forEach((item,index) => { if(list==index){ var i = 'model['+index+'].active' this.setData({ [i]:!(this.data.model[index].active) })}
}); }, });实现原理:
在需要渲染的 view 里面先
wx:for
循环,给每一个 view 绑定一个点击事件。在自定义一个属性data-list="{{index}}"
这个自定义值不是数组的下标。在数组中添加一个属性名为 active 的属性。值为布尔类型。true 和 false 都可以。看自己的选择,在图片的 src 属性上使用三元表达式:src="{{item.active?item****.****src** **:** **item****.****url**}}"
这里不要漏掉=
和""
双引号。判断数组里面的 active 的值,如果为 true,则图片路径为第一个,反之则为第二个。数组里面保存的是两个图片的路径,页面只保留一个图片的路径用做计算三元表达式的值即可。在 js 中,声明一个变量来接受刚才在 view 里面自定义的属性。
const list = e.currentTarget.dataset.list
,使用 forEach 循环数组。用循环出来的 index 和自己定义属性值对比,如果相等,证明点击的就是当前数组中的[index]
某一项。这时候在声明一个变量i
来接受当前数组中每一项的(这里用 index 代表每一项)active 属性值。这时候。i 取反,再赋值给数组里面的 active(就是刚才声明的 i)。
this.setData({ [i]:!(this.data.model[index].active) })
# 小程序中的父传子
父组件(页面)向子组件传递数据,是通过标签属性的方式来传递的。
以下代码表示,向子组件
iuiu
中传递数据,在父组件的 WXML 中,list 是标签名,传递当前 wxml 的 js 文件中的list
数组,<iuiu list="{{list}}"></iuiu>
在子组件的 js 文件中,在
properties
中接收父组件传递过来的数据
properties: { list:{ type:Array, value:[]}
},
list
是父组件中传递过来的标签名。type,类型:Arrye、String、Number、Boolean、Object、null(表示任意类型)
value
可以给定初始值,可以默认为空。
# 小程序中的子传父
子组件向父组件传递数据,是通过事件的方式传递的。在子组件中绑定的方法中声明一个变量,把需要传递的值赋值给这个变量,在通过
this.triggerEvent
这个事件传递给父组件.
methods:{ hangent(e){ const index = e.currentTarget.dataset.index this.triggerEvent("itemChange",index)}
}
触发父组件中的自定义事件,同时传递数据给父组件。
this.triggerEvent("父组件自定义的名称","要传递的参数")
例如:上面的子组件传递的方法名为
itemChange
,那么父组件中因该这么写:<iuiu list="{{list}}" binditemChange="dianji"></iuiu>
bind+方法名=父组件中需要定义的函数名称。
dianji(e){ const index = e.detail console.log(index) let list = this.data.list list.forEach((item,i) => index===i?item.active=true:item.active=false); this.setData({ list })}
这里需要注意的是,传过来的值不是在
e.currentTarget.dataset
之中,而是在e.detail
中。
# 组件中的插槽使用
slot
slot 标签,其实就是一个占位符,插槽。等到父组件调用子组件的时候,再传递标签过来,最终,这些被传递过来的标签就会替换 slot 插槽的位置。
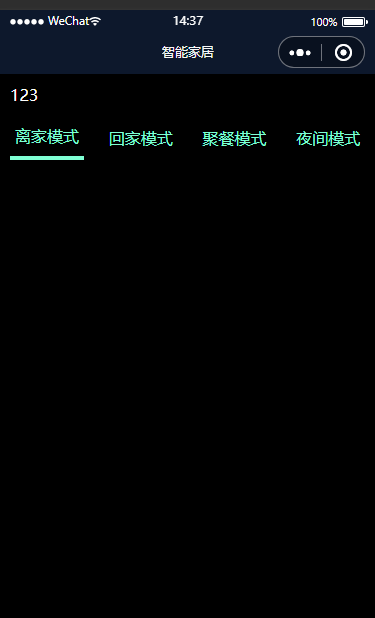
效果图如下:
点击不同的导航,切换到不同的插槽。
子组件wxml代码:
<view class="content"> <slot></slot> </view> <view class="box"> <block wx:for="{{list}}" wx:key="id"> <view bindtap="hangent" data-index="{{index}}" class="item {{item.active?'isactive':''}}">{{item.name}}</view> </block> </view>
子组件js代码
Component({ properties: { list:{ type:Array, value:[]}
}, data: { }, methods:{ hangent(e){ const index = e.currentTarget.dataset.index console.log(index) this.triggerEvent("itemChange",index)}
}
})
父组件中wxml代码
<iuiu class="ii" list="{{list}}" binditemChange="dianji"> <block wx:if="{{list[0].active}}">123</block> <block wx:elif="{{list[1].active}}">456</block> <block wx:elif="{{list[2].active}}">789</block> <block wx:else>否则显示</block> </iuiu>
父组件中js代码
Page({ data: { list:[ {"id":1,"name":"离家模式","active":true}, {"id":2,"name":"回家模式","active":false}, {"id":3,"name":"聚餐模式","active":false}, {"id":4,"name":"夜间模式","active":false}]
}, dianji(e){ const index = e.detail console.log(index) let list = this.data.list list.forEach((item,i) => index===i?item.active=true:item.active=false); this.setData({ list })}
})以上的插槽是配合组件间的传值使用的。
# 在小程序中截取字符串
App.$get('/warn/page', {}, res => { console.log(res); res.rows.forEach((item) => { item.ctime = item.ctime.substring(0, 10); // 截取时间格式为 xxxx-xx-xx }) this.setData({ AlarmType:res.rows }) console.log(this.data.AlarmType); })直接在需要截取的变量后面点
substring()
小括号里面放需要截取的开始位置和结束位置下标从 0 开始。。